
|
This one is a request from David, he was at Adobe MAX taking the Infographics Class and wanted to know how to make a texture in Illustrator. There are patterns in AI, but not really textures and they tend to be pixel based. But I am going to start with an image of wrinkled paper and make it into a vector based texture 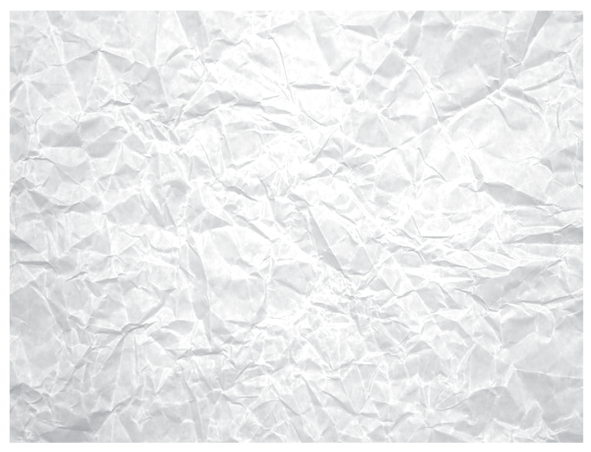 I found this paper on a Google search and opened it in Photoshop and converted it to Grayscale. You can use colored paper if you want colored texture but I start with grayscale and color it in AI. Also, by converting to Grayscale in Photoshop, I can adjust the values of the whites and shadows to get the right contrast. I then go into AI, and choose File > Open and open the image right in Illustrator. It can be a PNG, JPG, TIF, PSD, PDF file. 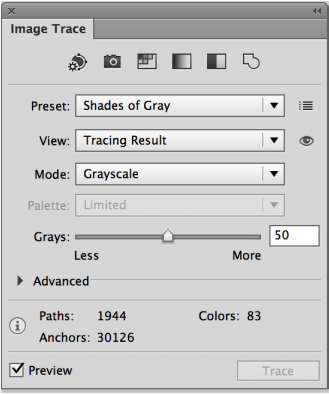 Then open Image Trace Panel under the Window > Image Trace. I set the Preset to Shades of Gray... there are many options here and I wanted it to look virtually the same as the image. View was set to Tracing Results so I can see immediately what it is looking like. Mode defaulted to 50 shades of gray.  This is the vector result, grayscale with 50 shades of gray selected. 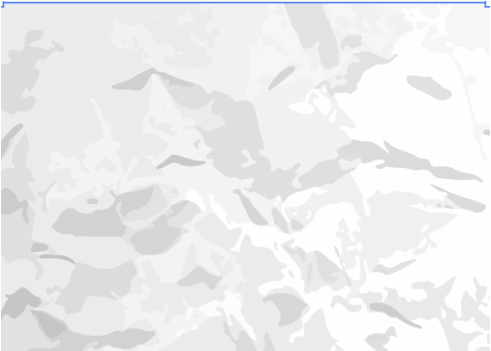 This is the same area set to 5 shades of gray, much less detail  Once the settings are chosen and the results are favorable, click the EXPAND button in the center of the Control Bar to convert the image to vector. The image is now gone from Illustrator and vector art is converted in its place. 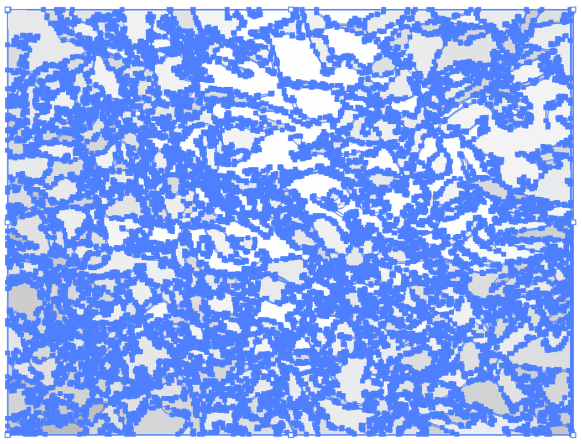 All that is vector, no more image!  And here is texture on top of a shape, and the Opacity set lower than 100% to let the texture look like it is on top of the shape.  A nice trick is to take the paper texture, using the Opacity menu from the Control Bar, you can set the texture to a Blend Mode other than Normal. In this case, I use Multiply which makes anything WHITE in the texture transparent and everything else translucent or see through so that it allows the color/shape from below to be visible.
0 Comments
Ok, this is a super easy way to create a triangle in Illustrator. And it does not involve the "wonderful and awesome" Pen Tool. I post this because I have seen many, many people over the years trying to draw and equilateral triangle with every tool and method, all of which were not easy. And people struggled to make things perfect... or close enough.
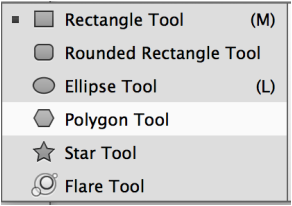
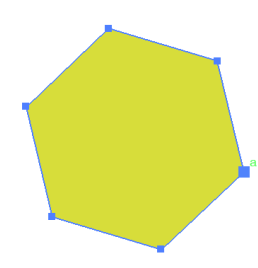
Start by selecting the Polygon Tool nest in the shape tools in the tool bar. By default it draws 6 sides, or it uses the last preset used. If you hold SHIFT, it will keep the bottom side perfectly horizontal. Hold the mouse down while drawing and don't let go or else you will have to start over! 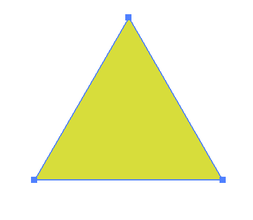 With the mouse held down while drawing, use the DOWN ARROW on your keyboard to reduce the number of side to 3. Hold the SHIFT to keep the bottom side horizontal. 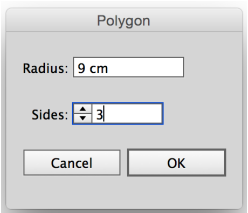 Another method is to take the Polygon Tool and just CLICK on the document, don't draw with it.
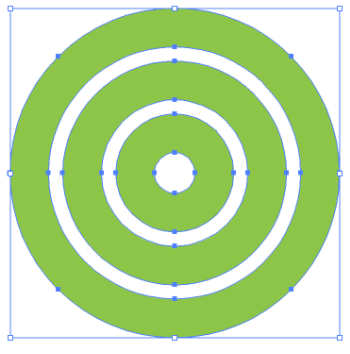
Clicking will open up a dialog box and you can set the number of sides and the Radius. Radius is the measurement from the center to an outside point. Once you set this, it will become your new preset for the Polygon tool while you have the document open and you can just draw yourself hundreds of triangles if you want. Thanks for viewing and please pass this along! This lesson is a simple yet effect one. How to create concentric circles that are all the same width AND have the same spacing in between them all. You could try to draw each one separately, then try to space them apart and they never quite work as well as you would hope. Here is a way to make it exact, every single time. Start with the Polar Grid Tool, it's nested in with your Line Tool and Arc Tool. Most likely this is the first time you have used this! 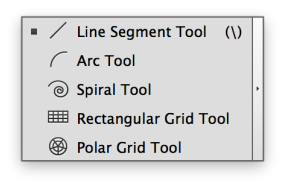 Draw with the Polar Grid Tool while holding SHIFT. DO NOT LET GO OF THE MOUSE or you will have to delete what you have drawn and start again. Make sure to hold SHIFT to create a perfect circle as well. 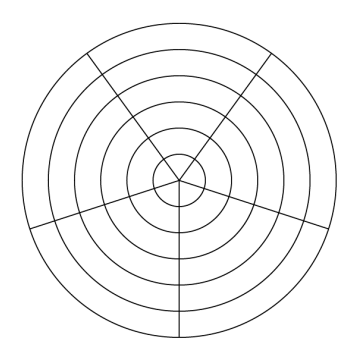 Keep holding the mouse and the shift key while you perform the next steps!!! Using the UP ARROW on your keyboard, you can ADD more rings, DOWN ARROW will SUBTRACT rings. Don' let go of the mouse yet! 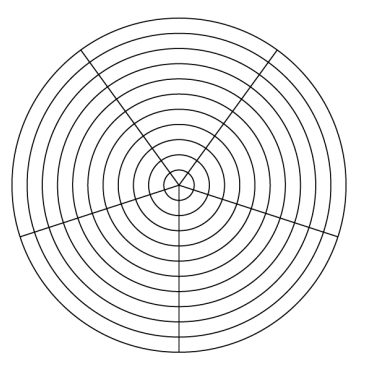 Using the RIGHT ARROW, this will ADD more division lines, LEFT ARROW will SUBTRACT the division lines and you can decrease down to NO LINES. 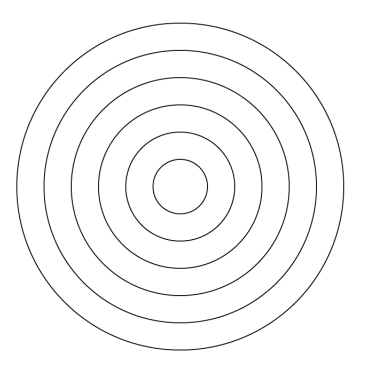 Now you can let go of your mouse, and THEN the SHIFT key. If you let go of SHIFT first, it will not retain a perfect circle and you will have to start all over again. 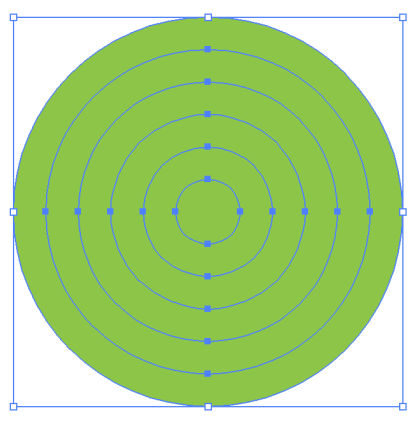 Fill the shape with a color and turn off the stroke weight and color. Then, using the Pathfinder Panel, choose Exclude Mode (far right of the Modes) 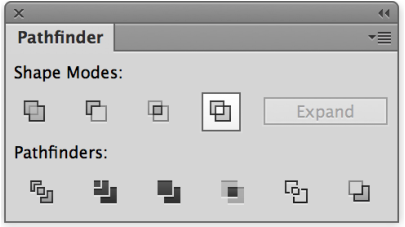 The resulting shape will be concentric rings with every other ring colored! Success! 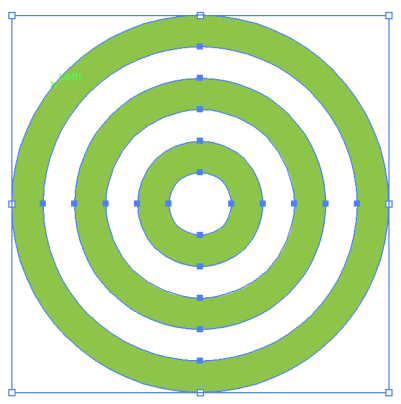 And remember to Ungroup this (Object > Ungroup or SHIFT + COMMAND + G). Every time you run a Pathfinder operation, Illustrator groups things together. This takes a while to get into the Ungroup habit but you will begin to remember this step. ADDED BONUS HERE: If you want to have the space between concentric circles tighter, here is a way to do this easily. 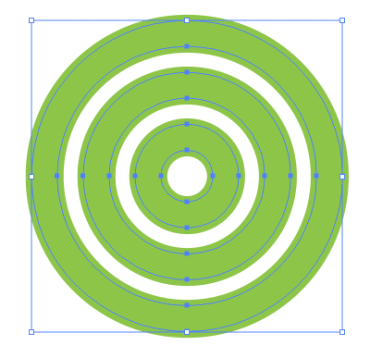 Select the circles and add a stroke to them using the same color. (Above) 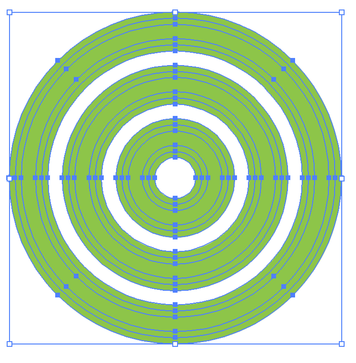 Outline the Stroke using Object > Path > Outline Stroke. (It is not a "best practice" to keep this as a stroke.) If you scale this it may scale the stroke depending on your preferences. Or it may not scale the stroke and the gaps between may fill in our get bigger.
Using the Combine / Unite Pathfinder Mode (far left shape mode) this will combine the outlined stroke and the fill together, leaving you with larger rings and smaller spaces.
And make sure to Ungroup again as the Pathfinder modes just grouped them all together again. Share this with friends and keep on creating! Representing data in a pie chart can help make an infographic look engaging, just as long as it's not a normal (boring) pie chart. Adding color, shading and interest helps tell a more interesting story.  Start with a drawing a circle. Hold SHIFT to create a perfect circle. Keep the fill off, add a stroke and set the point size (in this case it's 40 pt stroke)  Outline the Path to convert the path to a shape. Object > Path > Outline Stroke. 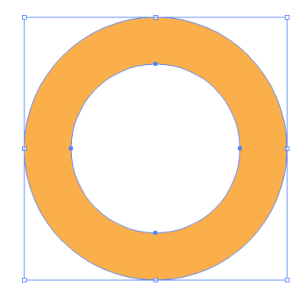 Draw a line from the center of the circle, hold the SHIFT down to create a vertical line. Draw the line beyond the outside edge and add a 1pt stroke to the line. Color of the stroke is not important as the line will go away... in a few steps. 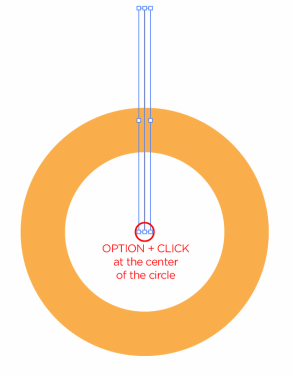 Select the vertical line, then select the Rotate Tool (R) and bring the cursor to the center of the circle, hold OPTION and click in the exact center of the circle. OPTION brings up the Rotate Dialog box, click relocates the reference point at which the rotate command will rotate around. With the rotate dialog box, you can convert a PERCENTAGE to degrees in a circle. 1% = 3.6° of rotation. Instead of using a calculator, you can do the calculations IN the field as shown below.\ In this case, I am using 38% and multiplying it by 3.6 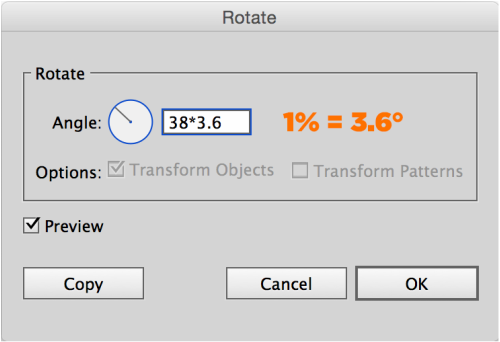 DON'T CLICK OK, you want to click copy instead. The calculation in the field will then rotate the line but you want to COPY the line to keep the original vertical line and get the second line rotated to the new angle that is calculated. 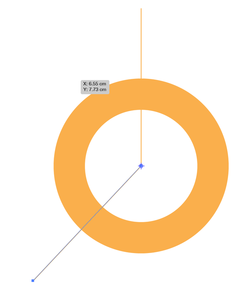 Select both lines and the circle. Using the Divide the action in the Pathfinder Panel, this will divide the circle at the line intersections. Then Ungroup the resulting shape (Object > Ungroup) 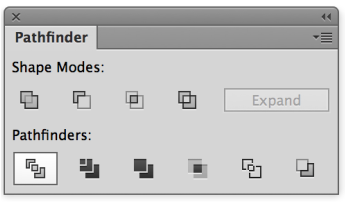 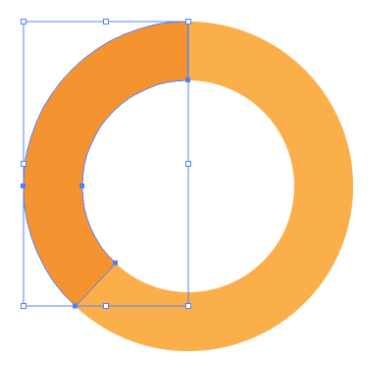 Select one section of the newly divided circle and change the color. To add additional shading to the section, select the section of the circle and then choose the Draw Inside function at the bottom of the Tool Bar. 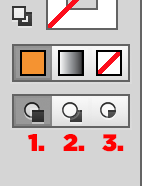 1. Normal Drawing Mode: This is what is selected by default. This allows everything to be drawn in front of other elements. 2. Draw Behind Mode: Draws everything behind the current objects. 3. Draw Inside Mode: This is the easy way to do a clipping mask. Everything that is drawn in the mode is drawn INSIDE the selected element. 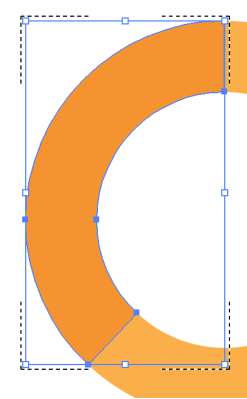 When the Draw Inside Mode is selected after the shape is selected, you will see a "clipping" line around the object. Everything that is drawn goes INSIDE this selected shape until the mode is changed to Normal Drawing Mode by clicking on the appropriate button at the bottom of the Tool Bar. 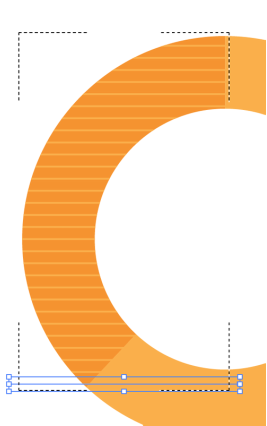 Draw a line, hold down the SHIFT key to make it straight. Choose a stroke weight that works well and choose a color that offers come contrast with the fill color of the object. To duplicate the first line, hold OPTION + SHIFT and drag the line and position it with the appropriate spacing. Then use COMMAND + D to duplicate it repeatedly to fill the shape.  In Preview Mode (COMMAND + Y) you can see the lines that were created and duplicated in the shape area. Once you get out of Preview Mode (COMMAND + Y) the lines will be masked or "clipped" by the shape. Make SURE you click back on the Normal Draw Mode at the bottom of the tool bar or everything you draw will be INSIDE the shape!!  Add some type to the shape and you have a great way to show a percentage. And a creative way to represent a boring pie chart in an interesting way!
How to create a simple paper cup, nice rolled top edge. Start with a rectangle and fill it with a color, no stroke on it.  Take the Direct Selection Tool (A) and select only the upper left corner point. hold SHIFT and then use the left arrow to move the point to the left. Shift increases the increment of the left arrow movement by 10. Do this action 2 or 3 times to angle the edge out. Do this on both upper points to match the angle on each side. 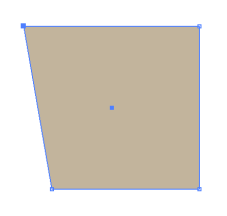 Repeat the same action by selecting the upper right point with the Direct Selection tool and SHIFT + right arrow to move the point. 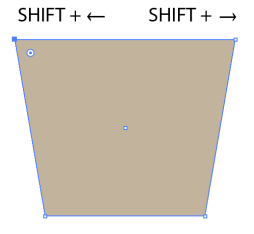 Draw a line above the cup, the same width as the cup. Add a stroke weight to the cup and choose the same color stroke as the fill color of the cup. Add rounded caps on the end of the lines. 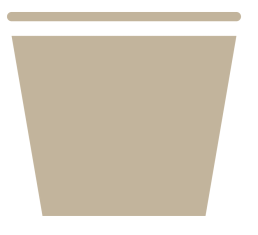 Select the line with the Selection Tool and convert the path to a shape. Object > Path > Outline stroke 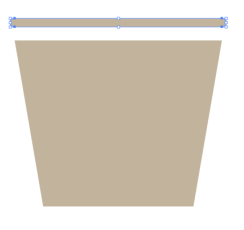 Move the line down to touch the top of the cup, the select both the cup and the line and use the Unite action in the Pathfinder panel. 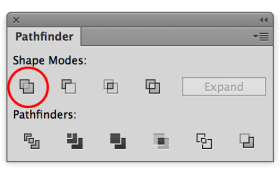 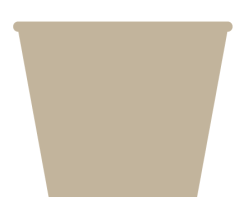 Select the cup with the Selection Tool, hold OPTION and SHIFT. Click and drag the cup to the left to duplicate the cup, about 1/3 of the way left. Preview Mode ( COMMAND + Y) shows the outline of the cup duplicated. 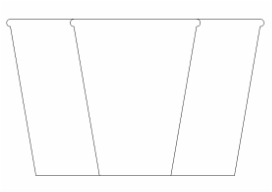 With the Preview Mode turned back on (COMMAND + Y), select both cups and use the Divide action in the Pathfinder Panel to divide the cup into sections. 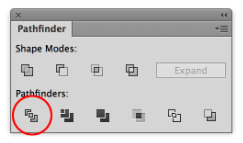 Once the Divide mode is applied, select the cups and Ungroup them. Object > Ungroup (COMMAND + SHIFT + G). Them select the left section of the cup and delete it.  Select the right edge of the cup section with the Selection Tool, change the color to a darker color to create a cast shadow appearance.  And that is a simple paper cup, with or without the cast shadow lighting effect.
|
Archives
March 2021
|

 RSS Feed